How to Adapt
Here's a step-by-step guide to help you adapt to the changes introduced in Version 3.
Understanding data migration and retention
After updating to Version 3, your Version 2 data remains intact and frozen. You have multiple options:
- Start fresh: begin with a clean slate in Version 3 and decide to migrate your Version 2 data at any point in the future. Note that migrating later will overwrite any new data you've added in Version 3.
- Immediate migration: migrate your Version 2 data immediately after updating. This will allow you to continue with your existing data seamlessly.
- Clean previous data: if you feel the old data is no longer relevant, you can choose to clear it out and start anew.
Familiarize yourself with the new dashboard
Spend some time exploring the revamped UI. The modern design is not just aesthetically pleasing but also more intuitive, making tasks quicker and more efficient.
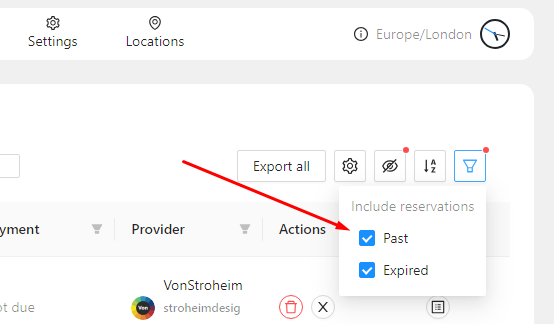
Locating past reservations
Upon migrating to the new version, you might notice that your past reservations aren't immediately visible in the reservations table. This is because the updated system is designed to hide past reservations by default for a cleaner view. Rest assured, your previous data is intact.
To view your past reservations, simply enable the corresponding table filter.
Timezone adjustments
We've revamped how timezones are handled in both the backend and frontend. For a comprehensive understanding, please consult our dedicated timezone guide.
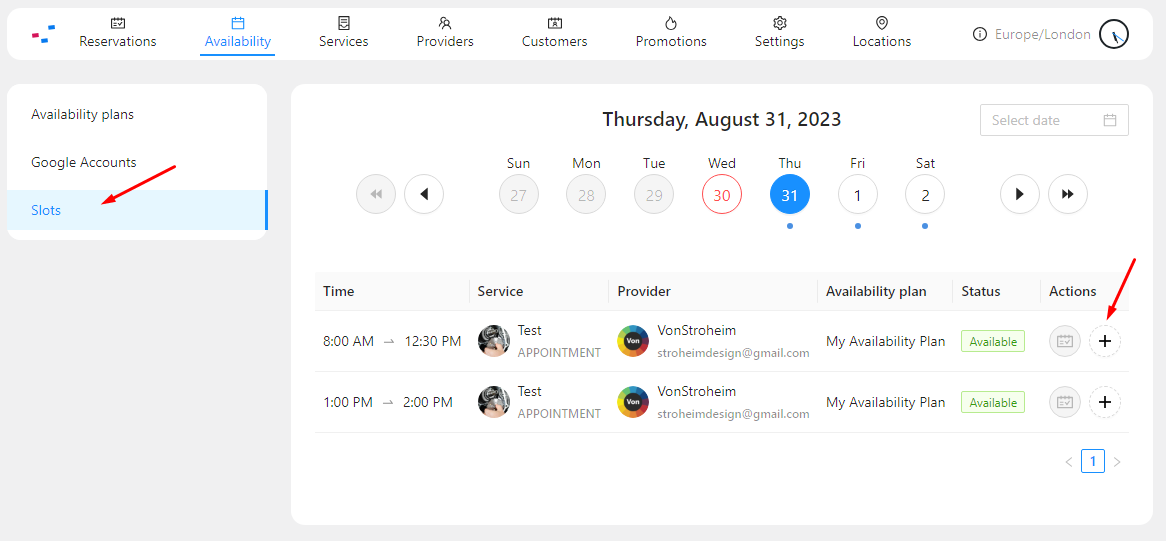
Backend reservation entry
Navigating through time slots in the backend has been made more intuitive. Additionally, you now have the capability to directly add a reservation. Simply locate the desired slot and click on the "add" button.
Reconfigure Google Calendar integration
In Version 3, multiple Google Calendars can be connected to a single Availability Plan, which is then linked to specific services. Each of these calendars can play one or more roles within one or more Availability Plans. These roles are:
- Source: a calendar in this role indicates available times for the services connected to the plan.
- Personal: events in a calendar with this role will block the availability of the services connected to the plan.
- Destination: this is the calendar where reservation events (events created after a booking) are added.
This new structure provides greater flexibility in managing availability and reservations across different calendars and services.
Any event in a source calendar is interpreted as available time for the services connected to the plan. This is a departure from Version 2, where specific event titles in a calendar were used to denote availability for a service.
Deciding on existing events:
If you have existing events in your Google Calendar that were used for availability in Version 2, you'll need to decide how to handle them.
If these events are still relevant, consider moving them to a dedicated calendar that will be linked to an Availability Plan. If they are no longer relevant, you can either delete them or leave them in your main calendar if they serve other purposes.
Creating dedicated source calendars
To keep things organized and avoid confusion, it's recommended to create dedicated calendars for each Availability Plan. Here's how:
- Go to Google Calendar.
- On the left side, click on "+ Add Calendar" and select "New Calendar".
- Name the calendar based on the service or Availability Plan it represents.
- Once created, move the relevant events (if any) to this calendar.
Linking Calendars to Availability Plans
Once you've set up your dedicated calendars, go to the TheBooking dashboard and link each calendar to its corresponding Availability Plan.
Event titles
With the new system, you no longer need to remember specific event titles to denote availability. This reduces the chances of errors and streamlines the process. However, for clarity, it's still a good practice to use descriptive event titles, especially if the calendar is shared with others.
Explore the internal Working Hours Planner
If you wish to reduce dependency on Google Calendar, use the internal planner to set your availability.
Customize your Booking Forms
With conditional form fields, you can now create dynamic booking forms. Set conditions to display specific fields, enhancing the user experience.
Test the new Booking Process
Familiarize yourself with the streamlined booking process. Consider making a few test reservations to understand the customer's journey.
Here's a comparison of the old and new processes:
Before:
- Day selection: the customer starts by selecting a day from the calendar.
- Time slot presentation: a list of time slots is presented, showcasing all available combinations of service-provider-time.
- Slot selection: the customer picks their preferred time slot to finalize the booking.
After:
- Day selection: just like before, the customer begins by choosing a day from the calendar.
- Step-by-Step process:
- Service selection: the customer is first prompted to select the service they're interested in.
- Provider selection: next, they choose their preferred service provider.
- Time slot selection: finally, they pick a suitable time slot.
Extended reservations
If configured, the plugin now offers the flexibility to select adjacent time slots, allowing customers to extend their reservation time. This new approach supersedes the previous cart feature, where customers could select a mix of slots, potentially leading to a more convoluted checkout experience.
Review Notifications and Reminders
Ensure that your notification settings are as per your preferences, especially with the new Google Calendar features in place.
Stay updated
We'll continue to roll out updates and improvements. Ensure you stay updated with the latest features and best practices.
Reach out for support
If you face any challenges or have questions, our support team is here to assist. Don't hesitate to reach out.